You may have already confirmed the product, packaging structure and quotation. Então, just when the project seems ready to move forward, the supplier asks one more question:
“Can you send us the print-ready artwork?”
This is where many custom packaging projects suddenly slow down.
Correct custom packaging artwork files help prevent missing fonts, blurry logos, incorrect colors, misplaced hot stamping, outdated dielines and unnecessary sample revisions. Mais importante, good artwork allows the packaging supplier to understand exactly how your box or tube should be printed and finished.
Então, before you send that final AI or PDF file, it is worth checking whether the artwork is actually ready for production—not simply whether it looks good on your screen.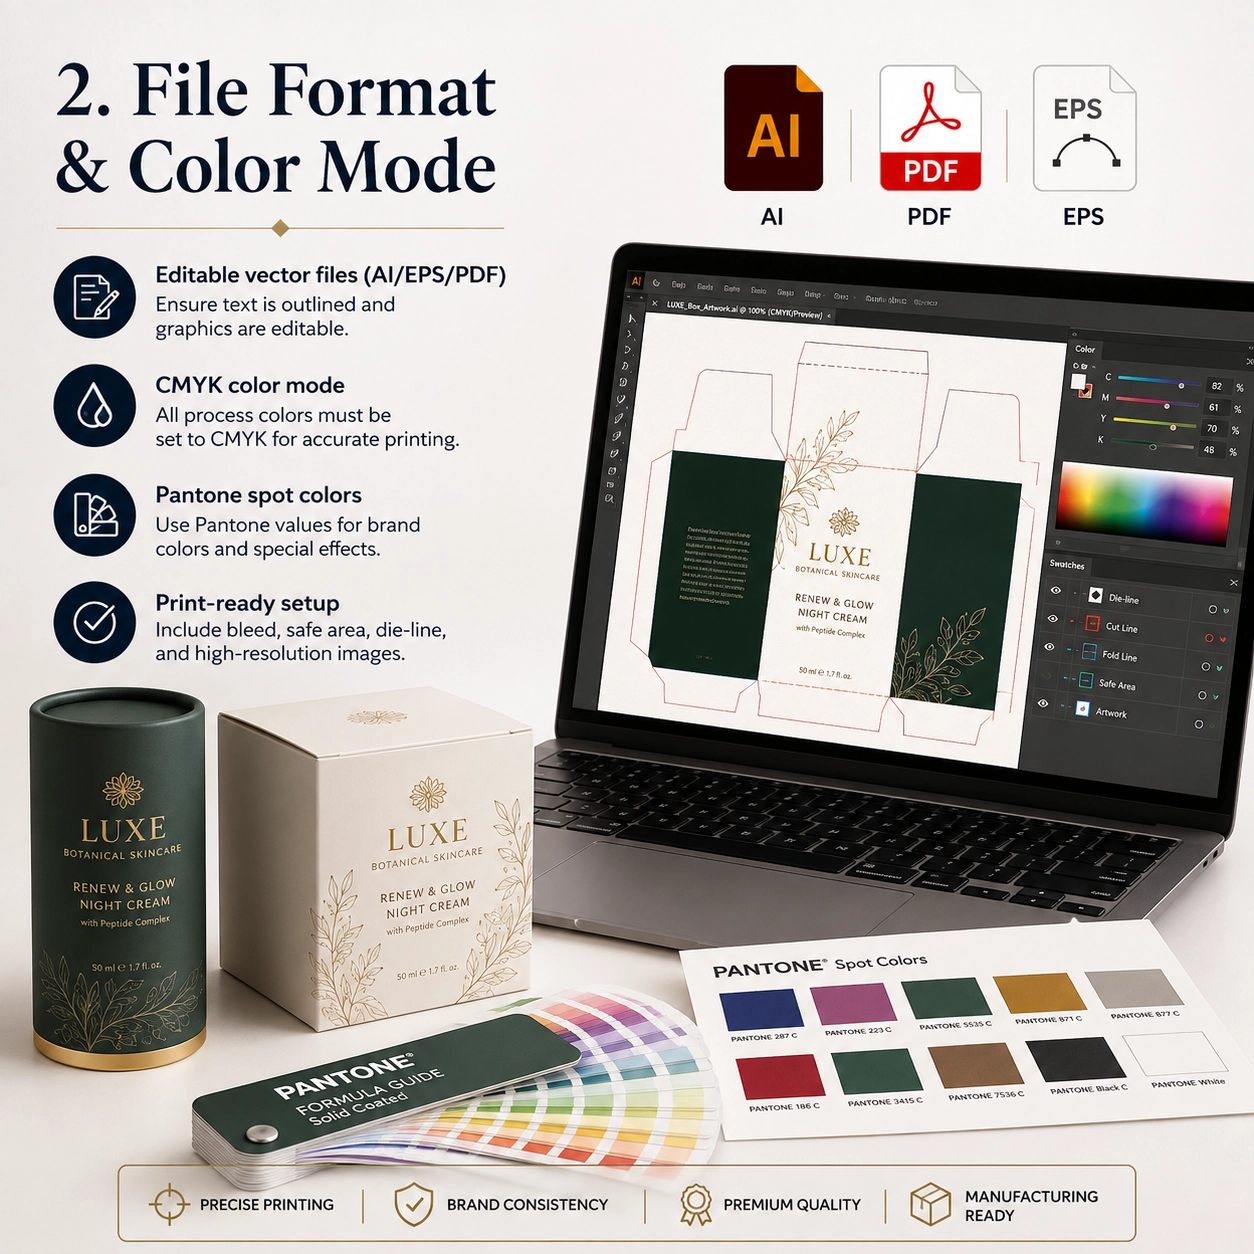
O que é este tipo de embalagem?
In this article, we are not talking about one particular box or paper tube. Em vez de, we are talking about the technical artwork required to manufacture custom paper packaging.
Custom packaging artwork files are production files built on the approved packaging dieline.
Unlike a JPG mockup, they tell the factory where to:
- Cut
- Fold
- Glue
- Apply foil
- Gravar
- Chefe
- Apply spot UV
- Create a window
- Position regulatory text
Em outras palavras, the mockup explains the visual idea, while the technical artwork explains how that idea becomes a physical package.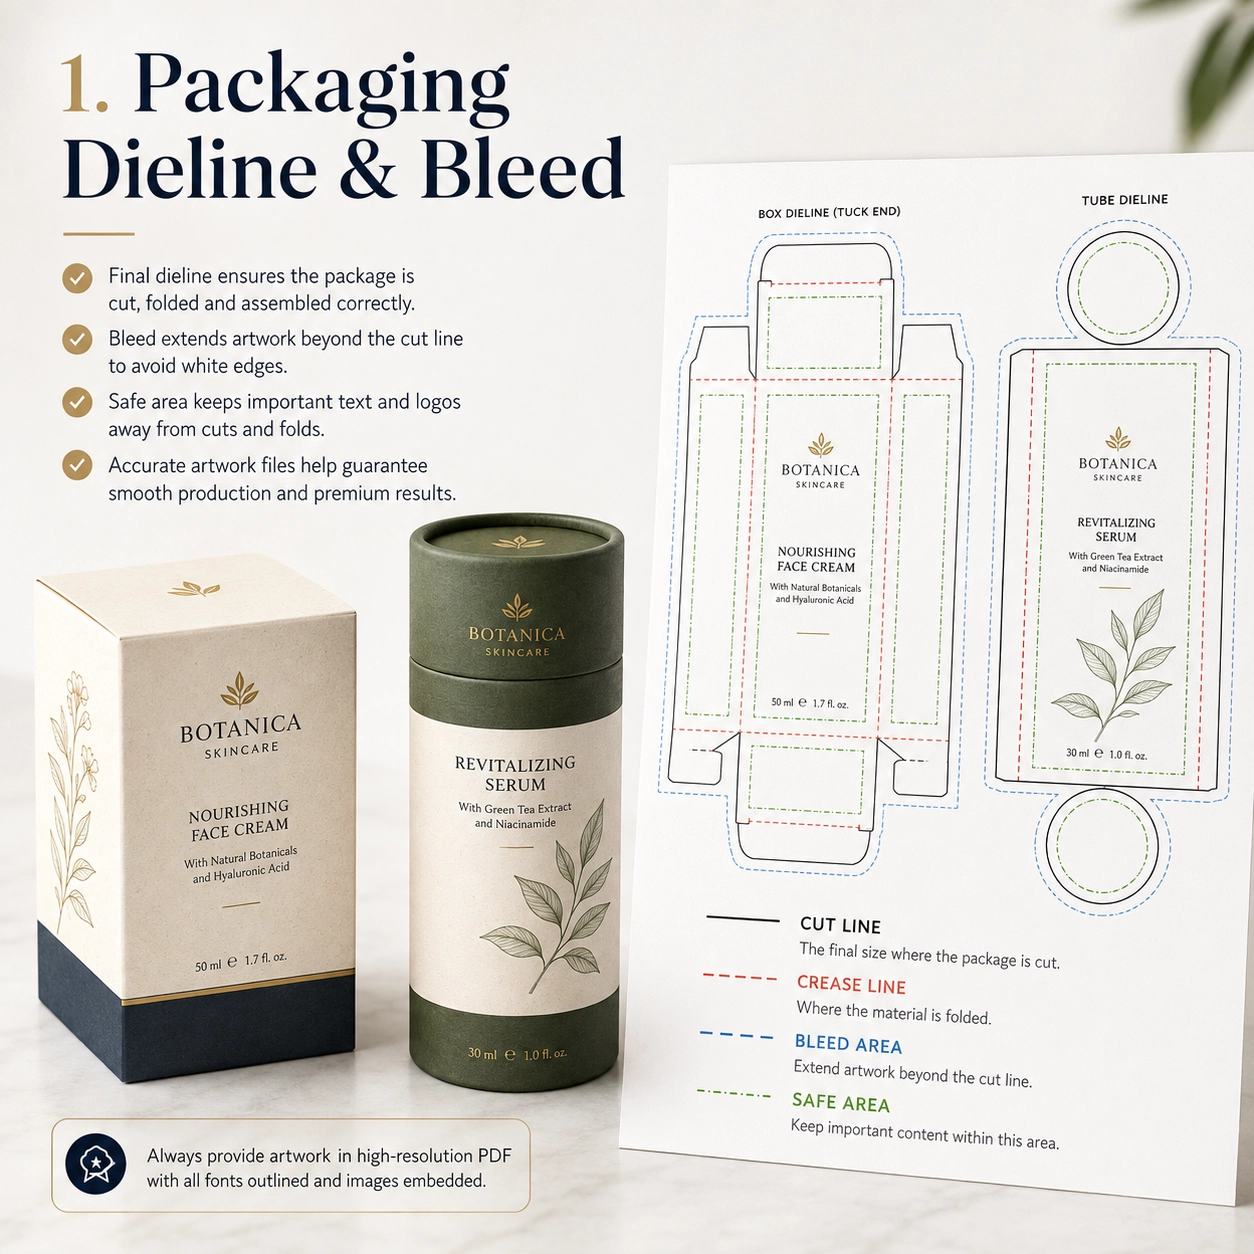
Common Artwork Components
A packaging production file may contain:
- Dieline
- Cut line
- Crease line
- Glue area
- Sangrar
- Safe area
- CMYK artwork
- Cores Pantone
- Product text
- Código de barras
- Hot-stamping layer
- Embossing layer
- Debossing layer
- Spot UV layer
- Window line
- Insert artwork
Portanto, the final artwork should always be created around the approved production structure rather than an estimated size.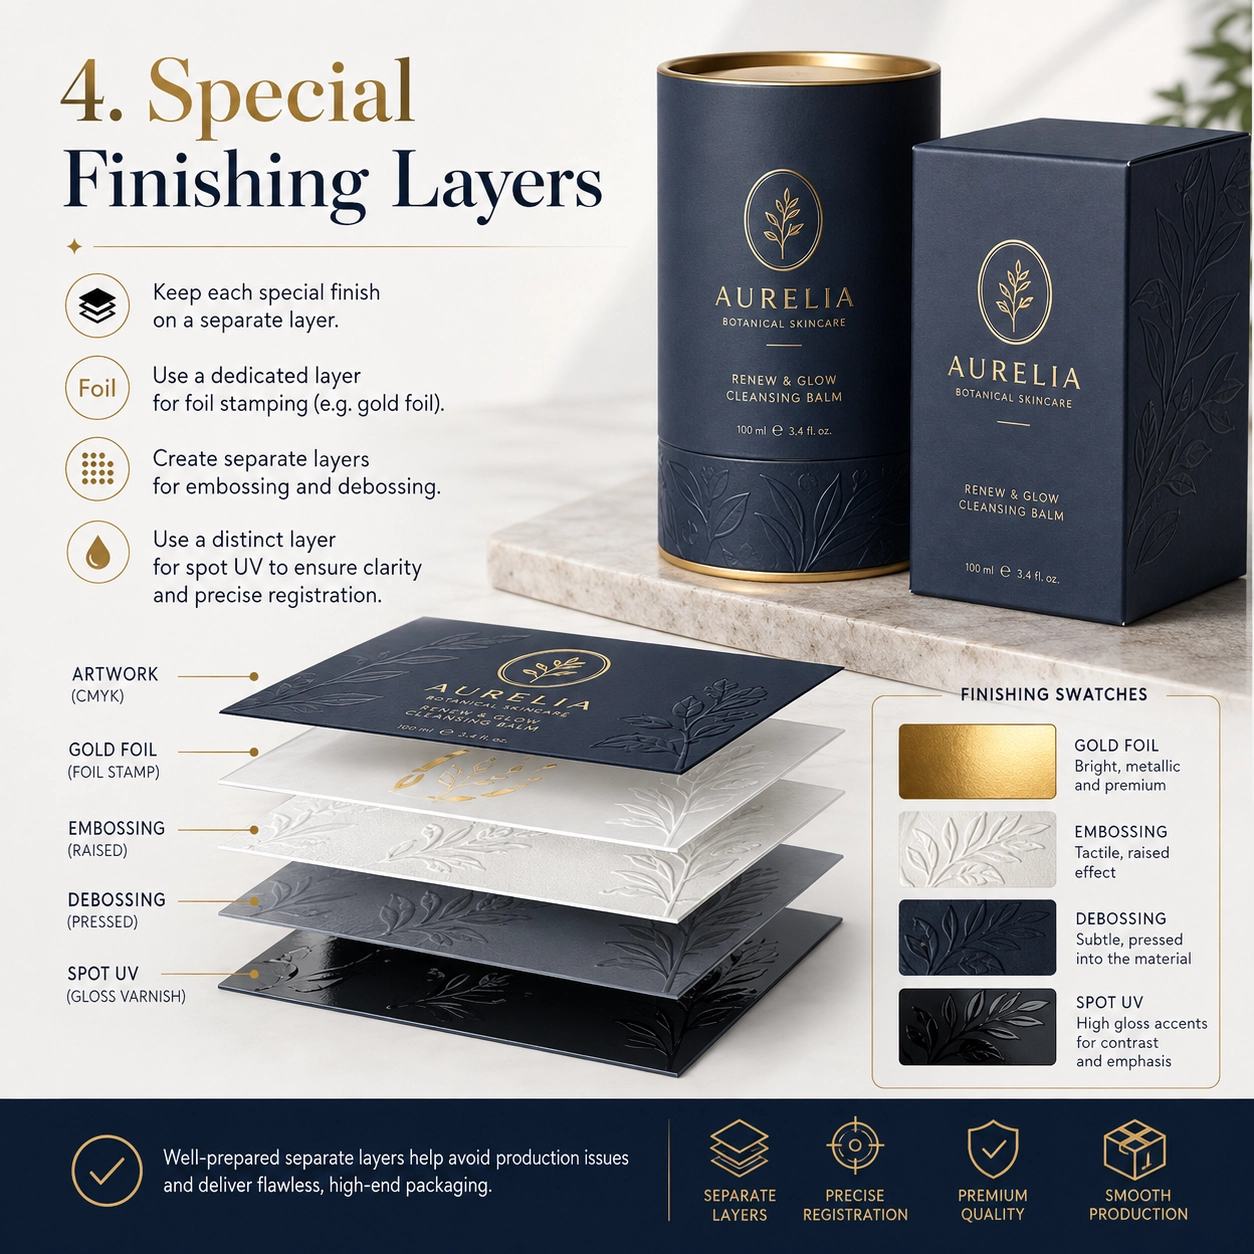
Preferred Artwork Formats
For many packaging projects, editable formats such as these are practical:
- IA
- PDF editável
- EPS
Enquanto isso, high-resolution PSD or TIFF files may be used for photographs or raster artwork.
Vector graphics are especially useful for logos, texto, dielines and finishing areas because Illustrator vector artwork can be scaled for print without the pixelation associated with low-resolution raster graphics.
Why JPG or PNG Is Usually Not Enough
A JPG may show the design clearly. No entanto, it normally does not contain editable:
- Dielines
- Spot colors
- Foil paths
- Embossing paths
- Cutting paths
- Separate finishing layers
Portanto, a JPG is better treated as a visual reference rather than the only production file.
If you only have a JPG, tell the packaging supplier early. The design or prepress team can then determine whether the artwork needs to be rebuilt.
Aplicativos comuns
The preparation of custom packaging artwork files varies according to the product category.
Perfume Packaging
Perfume packaging often looks visually simple but may involve several premium finishing processes.
Por exemplo, a rigid perfume box or paper tube may require separate layers for:
- Dark green Pantone printing
- Logotipo em folha de ouro
- Embossed brand mark
- Laminação fosca
- Insert branding
If the gold logo must also be embossed, the supplier needs to know whether the embossing follows exactly the same shape.
Portanto, separate the layers clearly.
A practical Illustrator layer structure could look like:
- DIELINE
- CMYK PRINT
- PANTONE
- GOLD FOIL
- EMBOSS
- SPOT UV
- INSERT
This makes communication much easier.
Cuidados com a pele e cosméticos
Cosmetic packaging often contains more written information than perfume packaging.
Typical content may include:
- Nome do produto
- Ingredientes
- Instruções
- Net contents
- Avisos
- Manufacturer details
- Código de barras
- Batch information
Consequentemente, typography and safe areas become especially important.
Before sending the artwork, check whether small text is too close to:
- Fold lines
- Cutting edges
- Windows
- Glue flaps
- Tube seams
Chá e Café
Tea and coffee packaging frequently combines branding with detailed product information.
Isto pode incluir:
- Country of origin
- Flavor notes
- Instruções de preparação
- Ingredientes
- Peso líquido
- Código de barras
If the artwork is printed on natural kraft paper, keep in mind that the brown paper base will affect how colors appear.
Portanto, do not assume that a color shown on a white monitor will reproduce identically on kraft paper.
Chocolate and Candy
Chocolate and confectionery packaging often combines:
- CMYK illustrations
- Fotografia
- Folha de ouro
- Windows
- Informações do produto
A window introduces an additional technical area.
Portanto, the artwork should clearly show the window die-cut line while keeping text and important graphics outside the required production tolerance.
Embalagem de velas
Candle packaging often uses simpler, more premium artwork.
A typical design might combine:
- Dark background
- Brand logo
- Scent name
- Botanical illustration
- Folha de ouro
- Peso do produto
No entanto, dark surfaces can make small printing or finishing inconsistencies more visible.
Portanto, physical sampling is especially valuable for premium candle packaging.
Embalagem para presente
Gift packaging gives designers more creative freedom.
No entanto, structures such as drawer boxes, magnetic boxes and telescopic packaging have several visible surfaces.
Consequentemente, the designer should consider the entire unboxing sequence rather than designing only the front panel.
Opções de materiais
The paper selected for production affects how custom packaging artwork files will reproduce in real life.
Papel kraft
Natural kraft paper has a brown base tone.
Portanto, bright colors may appear more muted compared with printing on white coated paper.
Suitable design directions include:
- Impressão em preto
- Verde escuro
- Brown
- White ink where supported
- Folha de cobre
- Matte gold foil
Na verdade, the natural material itself can become part of the artwork.
Papel artístico
Coated art paper provides a smooth surface for:
- Impressão CMYK
- Pantone
- Fotografia
- Tipografia fina
- Gradientes
- Ilustrações detalhadas
Afterward, it can receive:
- Laminação fosca
- Laminação brilhante
- Laminação de toque suave
- Anti-scratch lamination
Papel Especial
Specialty papers may include:
- Linen texture
- Leather texture
- Papel metálico
- Papel perolizado
- Papel tingido
- Embossed texture
No entanto, deeply textured surfaces can reduce the visual clarity of very fine details.
Portanto, extremely thin logo lines or small foil details may need to be simplified before production.
Papel de qualidade alimentar
Food packaging may require approved food-contact materials or internal barrier components.
No entanto, these technical materials are generally specified separately from the outer decorative artwork.
Por exemplo, the external design may be printed on art paper, while the inside uses:
- Papel de qualidade alimentar
- Papel revestido de PE
- Papel resistente a gordura
- Forro de folha
- Bolsa interna
Forro de folha
Chá, café, nuts and snack tubes may use an aluminum foil or multilayer liner.
Geralmente, the exterior artwork file still controls only the outer branding.
No entanto, if an internal component also requires printing, provide separate artwork and clearly identify the part.
Opções de estrutura
Packaging structure should be finalized before the designer completes custom packaging artwork files.
De outra forma, a structural change may force the artwork to be redesigned.
Paper Lid Tube
A standard paper tube normally contains:
- Main body
- Tampa
- Fundo
- Seam area
Avoid placing the main logo directly over the vertical seam.
Em vez de, define the primary viewing area.
Tubo ombro-pescoço
A shoulder-neck tube contains an inner neck that becomes visible after the lid is removed.
This creates another branding opportunity.
Por exemplo:
- Dark green exterior
- Gold inner neck
- Cream interior
No entanto, all visible components should be included in the approved material and production specification.
Estrutura telescópica
A telescopic tube may use:
- Long upper lid
- Short lower base
- Inner insert
Portanto, the designer should confirm:
- Upper-section height
- Lower-section height
- Overlap
- Front orientation
Do not guess these dimensions.
Embalagem de janela
Window artwork must use the approved die-cut position.
The design should consider:
- Window shape
- Tamanho da janela
- Film area
- Product position
- Safe area
Além disso, the real product should remain aligned behind the window.
Paper Tube With Insert
An insert may use:
- EVA
- EPE
- Cartão
- Polpa moldada
- Plastic tray
If the insert includes printed paper or a branded card, provide a separate artwork file.
Push-Up Tube
Push-up paper tubes contain moving internal components.
Portanto, critical graphics should stay away from areas where movement or seams may affect visibility.
Twist-Up Tube
Twist-up packaging requires precise dimensions.
Por esta razão, the final dieline should be approved before artwork production begins.
Sleeve Packaging
Sleeves can be very useful for multiple SKUs.
Por exemplo, one base package may be used for five different products while each product receives a different sleeve.
Como resultado, brands can reduce structural complexity while maintaining product differentiation.
Impressão & Opções de acabamento
This is where custom packaging artwork files become especially important.
Different printing and finishing processes should not be merged into one unidentified artwork layer.
Impressão CMYK
CMYK is commonly used for process printing involving:
- Fotografia
- Gradientes
- Ilustrações
- Multicolor graphics
Adobe’s Illustrator print documentation instructs users to switch RGB documents to CMYK mode when preparing color separations for process printing.
No entanto, printed color can still be influenced by the paper, tinta, coating and finishing.
Portanto, do not approve critical brand colors solely from a phone or monitor.
Pantone / Spot Colors
Spot colors are useful when a brand requires a particular signature shade.
Por exemplo:
- Brand green
- Burgundy
- Navy
- Orange
Clearly identify the required Pantone or spot color in the artwork.
Do not simply write:
“Please match this green.”
Além disso, request a physical proof when strict color matching is commercially important.
Estampagem a Quente
Hot stamping should normally be provided as a separate vector layer.
Por exemplo:
GOLD FOIL
Do not create a gold gradient in Photoshop and assume that it communicates metallic foil production.
Em vez de, provide a clean vector shape showing exactly where the foil should be applied.
Gravação
Embossing raises the surface.
Portanto, provide a separate vector layer showing the exact embossed area.
A simple label could be:
EMBOSS
If foil and embossing must register together, make that clear in both the artwork and production instructions.
Gravação
Debossing creates a recessed surface.
Like embossing, it should be supplied as a separate, clearly labeled vector area.
UV localizado
Spot UV creates glossy contrast over selected areas.
Portanto, create a separate layer called:
SPOT UV
Do not merge the effect into the CMYK artwork.
Laminação fosca
Full matte lamination normally applies across the entire printed surface.
Portanto, it usually does not need its own artwork layer.
Em vez de, specify the film in the finishing requirements.
Laminação Brilhante
Gloss lamination follows the same principle.
No entanto, if only one logo or pattern needs gloss, the process may actually be spot UV rather than full gloss lamination.
How to Prepare Custom Packaging Artwork Files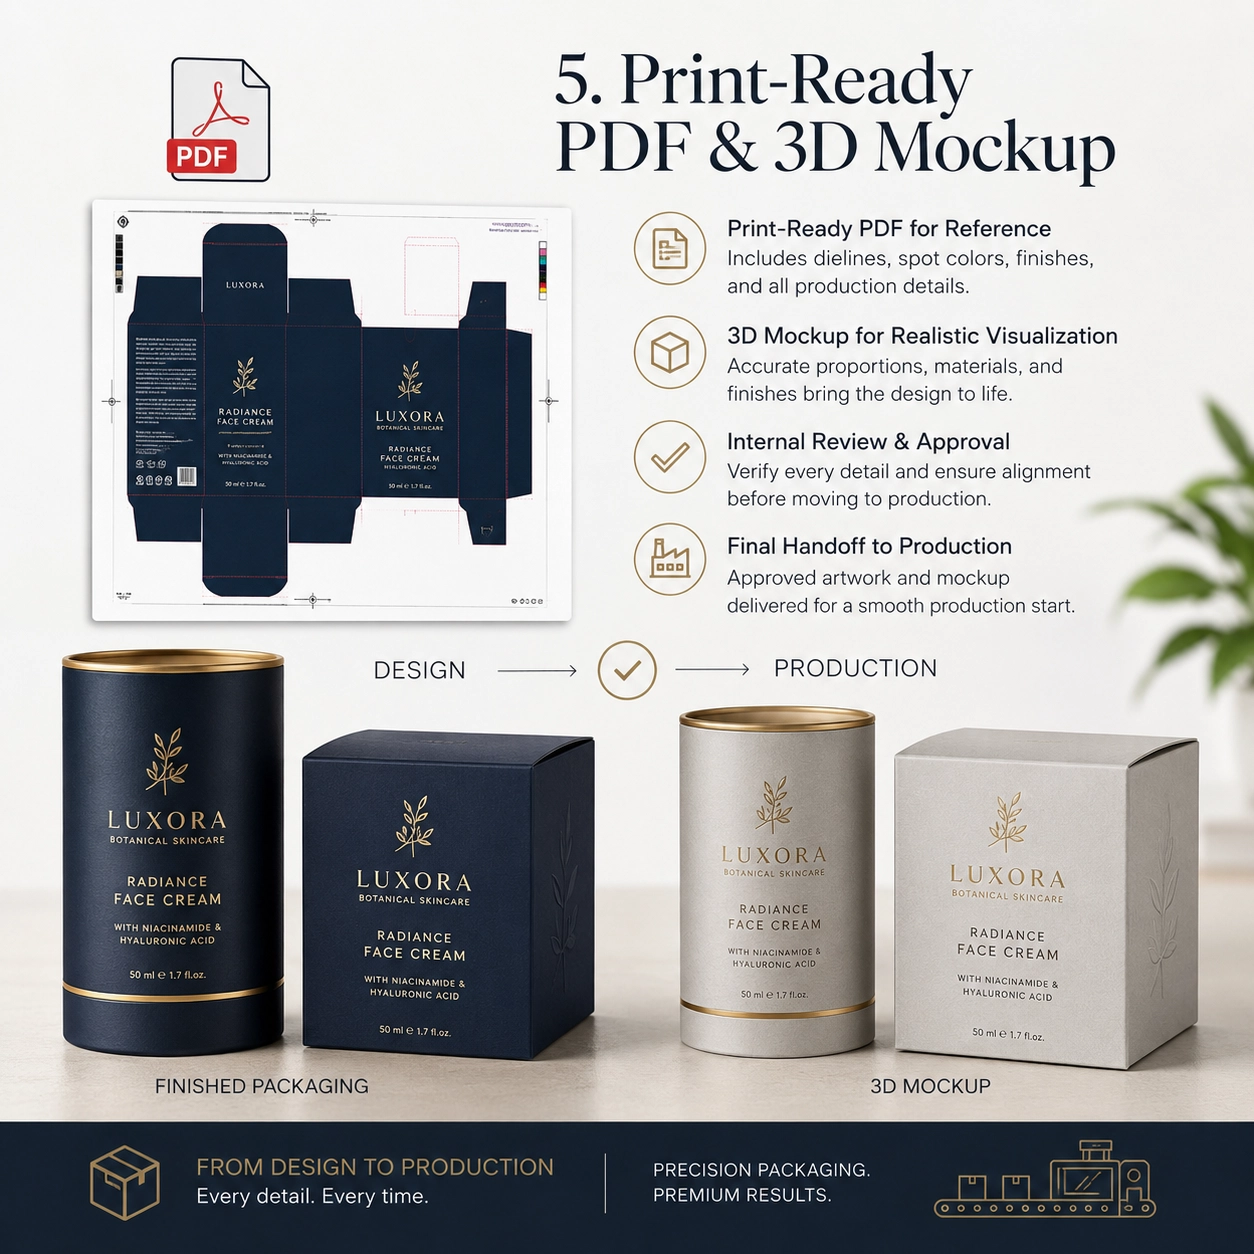

Before sending custom packaging artwork files to the factory, go through the following workflow.
Etapa 1: Use the Final Approved Dieline
Never design final production artwork on an early structural drawing.
If the package dimensions change, request a new dieline.
Etapa 2: Keep the Dieline at Actual Size
Do not resize or stretch the dieline.
A production dieline should represent the actual package dimensions.
Etapa 3: Add Bleed
If background colors, photographs or illustrations reach the trim edge, extend them beyond the final trim line.
Illustrator supports document bleed and printer marks through its Marks & Bleed controls.
Many commercial projects use approximately 3 milímetros, but the packaging supplier’s specification should always take priority.
Etapa 4: Respect the Safe Area
Keep important elements away from trim and fold tolerances.
These elements include:
- Logotipo
- Código de barras
- Nome do produto
- Ingredientes
- Small text
Etapa 5: Prepare the Correct Print Color Mode
For process printing, prepare the file using the agreed CMYK workflow.
If Pantone colors are required, identify them separately.
Etapa 6: Check Fonts
Missing fonts can change text layout.
Portanto, either outline the fonts where appropriate or package the required font resources according to the agreed workflow.
Adobe Illustrator’s Package command can collect the Illustrator file together with linked graphics and eligible font resources for handoff.
Always keep an editable master version before converting text into outlines.
Etapa 7: Check Linked Images
One of the most common handoff problems is missing linked images.
Illustrator’s Links panel shows placed linked and embedded files, while the Package function can gather linked assets for transfer.
Before sending the project, check that every required image is included.
Etapa 8: Keep Logos Vector Where Possible
Vector logos produce cleaner results for:
- Impressão
- Estampagem a quente
- Gravação
- Scaling
Avoid extracting a small logo from a website screenshot.
Etapa 9: Separate Special Finishing Layers
A good file structure could be:
- DIELINE
- CMYK
- PANTONE
- GOLD FOIL
- EMBOSS
- DEBOSS
- SPOT UV
- WINDOW
This makes the intended manufacturing processes obvious.
Etapa 10: Check Overprint
Overprint settings can change how overlapping objects reproduce.
Illustrator includes dedicated overprint and color-separation controls, so these settings should be reviewed during prepress when relevant.
Etapa 11: Export a Print-Ready PDF
Along with the editable file, export a high-quality PDF reference.
Illustrator supports PDF creation for print workflows, including PDF/X-related options.
The supplier can use the PDF to compare the intended layout against the editable artwork.
Etapa 12: Include a 3D Mockup
A 3D rendering is not the technical production file.
No entanto, it is very useful because it shows:
- Front orientation
- Opening direction
- Posição do logotipo
- Expected finished appearance
Em outras palavras:
Artwork tells the factory how to produce it.
Mockups tell the factory how you expect it to look.
Providing both reduces ambiguity.
Packaging Artwork Preflight Checklist
Before sending your file, verificar:
- Correct dieline
- Correct packaging size
- Bleed included
- Safe zone checked
- CMYK workflow confirmed
- Pantone colors identified
- Fonts supplied correctly
- Linked images included
- Logos are vector
- Image quality checked
- Barcode checked
- Text proofread
- Foil layer separated
- Embossing layer separated
- Debossing layer separated
- Spot UV layer separated
- Window position confirmed
- Dieline kept separate
- PDF exported
- Mockup supplied
- Final internal approval completed
Acrobat Pro’s Preflight tools are specifically designed to analyze PDFs for print-production problems before output.
How Artwork Affects Sampling and Production Time
Poorly prepared custom packaging artwork files can delay a packaging project before manufacturing even starts.
Por exemplo:
The supplier receives a JPG.
Then the editable artwork is requested.
Próximo, the AI file arrives but linked images are missing.
Depois disso, the correct images are supplied.
No entanto, the dieline is outdated.
Once the dieline is corrected, the designer discovers that the foil layer has not been separated.
Another revision is required.
At this point, several days may have passed—even though no mass-production machine has started.
Portanto, good artwork preparation can directly improve the efficiency of the packaging development process.
Planning Your Packaging Lead Time?
Artwork approval is only one part of the overall project.
If you are also planning sampling, production and delivery, leia nosso Custom Paper Tube Production Time: Complete Lead Time Guide.
That guide explains how:
- Aprovação de arte
- Amostragem
- Quantidade mínima
- Disponibilidade de materiais
- Inserções
- Special finishing
- Multiple SKUs
can influence the complete production schedule.
Junto, these articles answer two important purchasing questions:
Is my artwork ready for printing?
e
How long will production take after it is approved?
Common Artwork Mistakes
Sending Only a Screenshot
A screenshot may show the design direction, but it usually cannot provide the editable technical information required for production.
Portanto, supply editable artwork whenever possible.
Designing Before the Structure Is Final
If the dieline changes, artwork positions also change.
Consequentemente, finalize the packaging structure first.
Missing Linked Files
Check all linked photographs and graphics before sending the project.
Low-Resolution Logos
A logo copied from a website may look acceptable on a monitor but reproduce poorly in print.
Em vez de, ask for the original vector version.
Using Too Many Unidentified Layers
Clear layer names reduce communication problems.
Por exemplo:
Layer 17 Copy 2
is much less useful than:
GOLD FOIL.
Merging Foil Into CMYK
The printer needs to know what should be printed and what should be foil stamped.
Portanto, keep those processes separate.
Ignoring the Tube Seam
For cylindrical packaging, avoid placing important branding on the spiral or vertical outer-wrap seam whenever the structure makes that area visually sensitive.
Designing on Hidden Areas
Some artwork can disappear beneath:
- Sobreposição de tampa
- Glue flaps
- Inner folds
- Sleeves
Portanto, check the assembled package before approving the design.
Conformidade & Sustentabilidade
Packaging artwork can also contain regulatory or compliance information.
Depending on the product and market, this may include:
- Nome do produto
- Ingredientes
- Net contents
- Avisos
- Manufacturer information
- Batch area
- Código de barras
- Recycling information
The brand, importer or responsible party should confirm the exact regulatory requirements for the destination market.
FSC
If an FSC trademark is used, its use should comply with the applicable certification and trademark-approval requirements.
Portanto, do not simply download an FSC logo and place it on packaging without confirming authorization.
Contato Alimentar
Food-contact safety depends on the approved packaging materials and full construction, not simply the exterior graphics.
Dependendo da aplicação, os compradores podem solicitar:
- Food-contact reports
- Migration reports
- Declarações materiais
- Ink information
- Adhesive information
BRC and IFS
BRCGS Packaging Materials and relevant IFS systems may support supplier-quality or food-packaging requirements.
No entanto, certification references and logos should only be used appropriately.
EUDR and EPR
For applicable markets and supply chains, packaging buyers may also need to consider material due diligence and producer-responsibility requirements.
Portanto, regulatory review should happen before the final artwork is locked whenever these requirements affect printed information.
Sustainable Artwork Choices
Luxury packaging does not automatically require the maximum number of finishing processes.
Por exemplo, good typography combined with textured paper and one small foil logo may create a stronger premium effect than:
- Full lamination
- Large foil areas
- Several metallic colors
- Multiple UV coatings
Portanto, good design can sometimes reduce production complexity as well as material use.
Como personalizar
A smooth custom packaging artwork files workflow starts before the designer opens Illustrator.
Etapa 1: Send Product Information
Fornecer:
- Nome do produto
- Tamanho do produto
- Peso do produto
- Fotos
- Physical sample if possible
Etapa 2: Choose the Packaging Structure
Select:
- Tubo de papel
- Rigid box
- Caixa dobrável
- Drawer box
- Sleeve box
- Window packaging
- Telescopic packaging
Etapa 3: Confirm the Size
Approve final dimensions.
Do not finalize the artwork before this step.
Etapa 4: Escolha o material
Select:
- Papel kraft
- Papel de arte
- Papel especial
- Food-grade material
- Forro de folha
Etapa 5: Confirm the Insert
As opções podem incluir:
- No insert
- Cartão
- EVA
- EPE
- Polpa moldada
- Plastic tray
Etapa 6: Confirm Printing
Escolher:
- CMYK
- Pantone
- Impressão em uma cor
- Combination printing
Etapa 7: Select Finishing
Possible choices include:
- Estampagem a quente
- Gravação
- Gravação
- UV localizado
- Laminação fosca
- Laminação brilhante
- Laminação de toque suave
- Anti-scratch lamination
Etapa 8: Request the Final Dieline
Once the structure and size are approved, request the final production dieline.
Etapa 9: Prepare a arte
Supply:
- IA
- PDF editável
- EPS where appropriate
Also provide a PDF reference and, ideally, a 3D mockup.
Etapa 10: Confirmar quantidade mínima
Provide realistic quantities.
Por exemplo:
- 500 peças
- 1,000 peças
- 3,000 peças
- 5,000 peças
- 10,000 peças
Etapa 11: Confirme o prazo de entrega
Share the required:
- Launch date
- Factory completion date
- Delivery date
- Destination
Etapa 12: Aprovar a amostra
Finalmente, verificar:
- Tamanho
- Estrutura
- Cor
- Arte
- Frustrar
- Gravação
- Inserir ajuste
- Posicionamento do produto
Once these points are approved, mass production can proceed more efficiently.
Produtos Relacionados: Tubos de papel personalizados / Embalagem de alimentos / Embalagens Cosméticas
Por que escolher a embalagem Pack?
A Pack Packaging oferece suporte a tubos e caixas de papel personalizados, desde o desenvolvimento estrutural até a produção em massa.
Nossa instalação de fabricação cobre 20,000㎡, incluindo um 2,000㎡ oficina de qualidade alimentar. Além disso, monthly paper tube production capacity exceeds 10,000,000 pedaços.
Nosso 20+ equipe de design membro pode ajudar com:
- Dieline development
- Product fitting
- Artwork checking
- Seleção de materiais
- Insert design
- Impressão CMYK
- Impressão Pantone
- Estampagem a quente
- Gravação
- UV localizado
- Amostragem
- Production preparation
When customers send custom packaging artwork files, our team reviews the graphic layout together with the actual structure rather than treating the design as an isolated image.
Nossos recursos OEM e ODM incluem:
- Tamanhos personalizados
- Tubos de papel
- Caixas rígidas
- Caixas dobráveis
- Caixas de gaveta
- Caixas de manga
- Papel kraft
- Papel de arte
- Papel especial
- Materiais de qualidade alimentar
- Cardboard inserts
- Inserções de EVA
- EPE inserts
- Inserções de polpa moldada
- CMYK
- Pantone
- Estampagem a quente
- Gravação
- Gravação
- UV localizado
- Laminação fosca
- Laminação brilhante
- Laminação de toque suave
- Anti-scratch lamination
- Amostras estruturais
- Printed samples
- Inspeção de qualidade
- Embalagem de exportação
Depending on the final materials, aplicação do produto e mercado de destino, supporting documentation may include FSC-related documentation, relatórios de contato com alimentos, BRC-related information, Informações relacionadas ao IFS, RoHS 2.0, REACH-SVHC and EPR support.
The exact documentation should always be confirmed against the final approved specification.
Perguntas frequentes
1. What file format should I send for packaging printing?
IA editável, PDF or EPS files are commonly useful for packaging production. A PDF reference and 3D mockup can also make the intended finished appearance clearer.
2. Should packaging artwork be CMYK or RGB?
For standard process printing, artwork is typically prepared in a CMYK print workflow. Illustrator provides CMYK document mode and separation controls specifically for print output.
3. Do I need bleed?
If artwork reaches the trim edge, bleed is generally required. Illustrator supports defined bleed areas and bleed marks, while the exact amount should follow the packaging manufacturer’s specification.
4. Do fonts need to be outlined?
Fonts can be outlined where appropriate or supplied through an agreed packaged workflow. Always keep an editable master file because outlined text is no longer normal editable type.
5. Do foil, embossing and spot UV need separate layers?
Sim. Clearly separated vector layers make it much easier for the prepress and production teams to identify each special process.
6. Can I send a Canva, JPG or PNG file?
You can use them as references. No entanto, the packaging supplier may still require editable production artwork containing dielines, vector logos and special-finishing information.
7. Why does the printed color look different from my monitor?
Screen display and physical printing use different output processes, while paper, tinta, coatings and lighting can also influence the final appearance.
Portanto, physical approval is recommended when exact brand color matters.
8. Can you help check my artwork before printing?
Sim. The design and prepress team can review the artwork against the approved structure and identify potential production issues before sampling.
Explore mais soluções de embalagens personalizadas
Procurando mais opções de embalagens? Descubra nossa linha completa de produtos de embalagens personalizadas projetados para diferentes indústrias e aplicações.
Caixas dobráveis – Caixas leves e totalmente personalizáveis para embalagens de varejo.
Caixas Rígidas – Caixas de presente rígidas premium para marcas de luxo.
Caixas de papelão ondulado – Soluções duráveis de embalagem para remessa e comércio eletrônico.
Caixas resistentes a crianças – Embalagem segura para produtos regulamentados.
Acessórios – Inserções personalizadas, papel de seda, fitas, rótulos, e mais.
Tubos de papel - Explore nossa coleção dedicada de embalagens personalizadas em tubos de papel para chá, café, cosméticos, velas, espíritos, e outros produtos premium em nosso site especializado.
Precisa de embalagem personalizada? Contate nossa equipe hoje para um orçamento gratuito e consulta especializada.